Per Sempre Alfa Magazine Article
Per Sempre Alfa is the offical magazine of the Alfa Romeo Owners Club of Australia (Queensland Division). This is an on-line version of an article originally printed in the magazine and is subject to the Australian Copyright Act. Other than for the purposes of and subject to the conditions prescribed under the Copyright Act, no part of this work may in any form or by any means (electronic, mechanical, photocopying, or otherwise) be reproduced, stored in a retrieval system or transmitted without prior written permission.
Spider Alloy Wheel Restoration
Keith Faulkner tracks down and refurbishes a set of original Campagnolo alloy wheels for his Spider (Published in August 2008 issue of the Magazine).
 When
I acquired my 1972 Spider Veloce a few years back, it was shod with
Yokohama tyres mounted on the original 14" x 5" steel rims. The rims
themselves were in good condition, having been given a re-spray when
the body was restored by the car's previous owner, but a badge was
missing from one of the stainless-steel hub centres. As a temporary
slight-of-hand, I glued a paper photocopy of one of the badges over the
missing spot, which looked surprisingly convincing from a distance of a
metre or more! This served as stopgap measure while I went in search of
something special - a set of 1970s factory-option 14" x 5.5" "Turbina"
style alloy rims.
When
I acquired my 1972 Spider Veloce a few years back, it was shod with
Yokohama tyres mounted on the original 14" x 5" steel rims. The rims
themselves were in good condition, having been given a re-spray when
the body was restored by the car's previous owner, but a badge was
missing from one of the stainless-steel hub centres. As a temporary
slight-of-hand, I glued a paper photocopy of one of the badges over the
missing spot, which looked surprisingly convincing from a distance of a
metre or more! This served as stopgap measure while I went in search of
something special - a set of 1970s factory-option 14" x 5.5" "Turbina"
style alloy rims.
While there is some debate as to whether the Turbina name was actually applied to the wheels fitted to 105 Series cars, it is frequently used by Alfisti to describe the turbine-blade style of alloy rims fitted to a number of models throughout the 1970s and 1980s. The two main manufacturers who supplied Turbina-style alloys to Alfa Romeo were Campagnolo and Cromodora.
At first glance, the Campagnolo rim (Photo 1) appears visually similar to the Cromodora version (Photo 2).
 Overall, however, the Campagnolos appear a slightly cruder
casting and a close inspection should reveal two obvious stylistic
differences: (a) the radial fins on the Campagnolo rims are more
pronounced, while those of the Cromodoras more closely follow the
cross-sectional profile of the rim, and (b) the pattern cast into the
area around the bolt-holes is different. If there is still any doubt,
the manufacturer's name is cast into the circumferential face of the
rim!
Overall, however, the Campagnolos appear a slightly cruder
casting and a close inspection should reveal two obvious stylistic
differences: (a) the radial fins on the Campagnolo rims are more
pronounced, while those of the Cromodoras more closely follow the
cross-sectional profile of the rim, and (b) the pattern cast into the
area around the bolt-holes is different. If there is still any doubt,
the manufacturer's name is cast into the circumferential face of the
rim!
 Apart
from the Turbinas, another contemporary style was offered by both
Campagnolo and Cromodora for 105 Series Alfas. Known as "Daytonas"
(Photo 3), these rims are wider and heavier than the Turbinas. Their
robustness and aggressive appearance mean they remain a popular choice
for fitting to these cars; so much so that high-quality reproductions
are now available from many of the specialist Alfa parts suppliers in
America and the UK.
Apart
from the Turbinas, another contemporary style was offered by both
Campagnolo and Cromodora for 105 Series Alfas. Known as "Daytonas"
(Photo 3), these rims are wider and heavier than the Turbinas. Their
robustness and aggressive appearance mean they remain a popular choice
for fitting to these cars; so much so that high-quality reproductions
are now available from many of the specialist Alfa parts suppliers in
America and the UK.
 A
later version of the Turbina-style of rim was also produced for fitting
to 116 Series Alfettas. Of course, these have a different stud
pitch-circle-diameter (PCD) as well as different offset and so can't be
used on 105 Series Alfas. The later Alfetta rims are easily recognised
as they have clear openings between all the radial fins, while the
Turbinas for 105 Series cars only have an opening every second fin.
A
later version of the Turbina-style of rim was also produced for fitting
to 116 Series Alfettas. Of course, these have a different stud
pitch-circle-diameter (PCD) as well as different offset and so can't be
used on 105 Series Alfas. The later Alfetta rims are easily recognised
as they have clear openings between all the radial fins, while the
Turbinas for 105 Series cars only have an opening every second fin.
While there may be only relatively small visual differences between 105 Series Turbinas produced by Campagnolo and Cromodora, the technical differences are more significant.
The Campagnolo Turbinas, originating as they did, from a small-volume manufacturer, are high-aluminium-content sand castings, weighing around 5.785kg each. While a carefully made sand casting can be very good, they tend to exhibit a bit more variability between individual castings. In addition, the surface can be a bit rough, or even porous. Consequently they are usually more time-consuming to finish and balance. Some late-production Campagnolos were supposedly produced using low-pressure die casting so these should suffer less from these issues.
The Cromodoras, being produced by a much larger manufacturer, are high-pressure injection-moulded die-castings with high magnesium content. The Cromodoras are slightly lighter (5.725kg) and more finely finished than the Campagnolos, which means they are also easier to balance and keep clean on the car.
The weight of a standard 14" x 5" steel rim for 105 Series Alfas, by comparison, weighs in at 8.0kg. And, just in case you were wondering, the later Cromodora Alfetta Turbinas, with less metal between the fins, are lightest of all, weighing in around 5.555kg each.
You may be wondering why all the concern about rim weights? Without going into a detailed discussion about the dynamics of automotive suspension, the total weight (or more accurately, the unsprung mass) of a wheel has an important effect on the handling and ride of an automobile.
The unsprung mass consists of everything outboard of the wishbones or suspension links, plus half the mass of the wishbones or links and spring/shock. Essentially, the lighter the mass you have attached to your suspension, the better it is able to work as a suspension.
When your car hits a bump, the idea is for the body (and passengers) to remain level, while the suspension and wheels travel up and down. All other factors being equal, a low-mass wheel (which includes the rim, tyre, balance weights, wheel cover, spinners, lugs nuts, etc) will allow the suspension system of a vehicle to react and recover more quickly, as well as placing less strain and stress on components.
Of course, wheel assemblies are expected to do much more than just go up and down, and inappropriate rim-tyre combinations can have many undesirable effects on your car. If you are fitting a rim-tyre combination outside of the manufacturer's original specification, especially to a car with unmodified suspension and steering, it's important that you consult the experts.
But, back to my own particular vehicle and my quest for new rims. My Spider is an early-build 2-litre model that rolled off the Milan production line in 1971. Some sources suggest that the Campagnolo Turbina-style rims weren't actually available as a factory option until a number of months later. Notwithstanding this, there is no doubt in my mind that the refined, almost delicate, styling of the Turbinas perfectly complement the sophisticated lines and gentle curves of 105 Spiders and Coupes, so I was more than happy to accept a minor anachronism with my specific vehicle.
Thus, with my sights firmly set on acquiring a set of Turbinas for my Spider, I placed an advertisement in Per Sempre Alfa seeking a set of the seemingly elusive items. After a few false leads, I discovered that Club member Michael Justice was in possession of a set of four and was offering them up for sale. Michael had originally acquired his wheels from another club member, current President Tony Vaughan. Michael rated the condition of the items as "a bit rough but OK", so on that basis we negotiated a price and arranged to meet at a mutually-convenient location and time to do the deal. The mutually-convenient location turned out to be a suburban petrol station and the time was between Michael's delivery runs for his turf-laying business on a blisteringly hot summer's day. The four rims, complete with tread-bare tyres were lying forlornly on the back of Michael's truck, covered in turf shreds and topsoil. We loaded them into my hatchback and I drove off in a cloud of grass chaff.
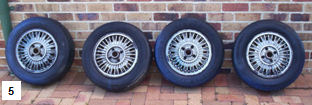 At
home, I trundled the wheels into the back yard and gave them a
preliminary clean with a pressure sprayer to remove some of the
accumulated crud and grime (Photo 5). A closer inspection revealed
three of the rims were in reasonably good condition, but number four
had led a harsh life, with significant kerb rash and a substantial
chunk taken out of the centre boss. Nothing terminal, it seemed, so it
was on to deciding the best way to get them restored.
At
home, I trundled the wheels into the back yard and gave them a
preliminary clean with a pressure sprayer to remove some of the
accumulated crud and grime (Photo 5). A closer inspection revealed
three of the rims were in reasonably good condition, but number four
had led a harsh life, with significant kerb rash and a substantial
chunk taken out of the centre boss. Nothing terminal, it seemed, so it
was on to deciding the best way to get them restored.
Initially, I gave some thought to having a go at refinishing the rims myself. With only basic tools in my workshop, however, and also wanting to have the rims checked for trueness, I eventually decided it was something best left to the experts. That was the plan, anyway.
Now, whenever possible, I try to support local businesses, so I did a trawl through the yellow pages for companies specialising in alloy wheel restoration and refinishing. I found a company at Albion and arranged to take the rims over for an inspection and quote. I arrived at the appointed time, but after an hour the business owner hadn't turned up. I was just about to leave when he arrived. In hindsight, I should have taken this as an omen.
The rims were duly inspected and the business owner seemed to be knowledgeable regarding the care needed to be exercised with alloy castings of this vintage. The plan was to do a very gentle media blast, spin them up to test for trueness, roll out any warps, weld any large gouges, then prime and finish with a metallic silver two-pack. A price was agreed and I arranged to call back after the estimated two months had elapsed. For the sake of brevity, I will skip over the next eleven months, apart from saying that after that period, my patience was exhausted. The work on my rims always seemed to be pushed down the list of jobs in the fellow's workshop. There was always some new and different excuse as to why the next promised completion date had lapsed. After nearly eight months, three wheels were ready for painting, but the fourth had only just come back from having a small crack welded. After another six weeks of inactivity, I finally advised the owner I would be retrieving my property the following week, irrespective of their state of completion.
So, after a very protracted and disappointing period, I had three rims ready for painting and the fourth straight, but needing cleanup and preparation. By this time, the tyres on my Spider were definitely at the end of their life and needed replacement. I wanted to avoid the hassle of fitting new tyres to the original steel rims, then having them refitted to the restored alloy rims, so I decided to push on and finish off the alloy rims myself as best I could.
 The
first step was cleaning up the welding on the fourth rim. Originally,
this rim had a slight warp in one section - possibly even from the day
it was cast - and the rolling process to true it up had made a fine
crack in the bead of the rim. A generous weld had been made to seal the
crack and the excess weld now needed to be ground back smooth to match
the contour of the bead. Using a hand-held Dremel rotary tool, I
carefully ground away the excess weld, finishing up with a fine file
and sandpaper (Photo 6).
The
first step was cleaning up the welding on the fourth rim. Originally,
this rim had a slight warp in one section - possibly even from the day
it was cast - and the rolling process to true it up had made a fine
crack in the bead of the rim. A generous weld had been made to seal the
crack and the excess weld now needed to be ground back smooth to match
the contour of the bead. Using a hand-held Dremel rotary tool, I
carefully ground away the excess weld, finishing up with a fine file
and sandpaper (Photo 6).
 This
was also the rim that had a chunk out of the centre boss, so I formed
up a new area using epoxy putty, a relatively simple process. When the
putty had cured, I filed it back to the profile of the boss. I also
used the putty to fill in a couple of deep gouges and an area of heavy
pitting.
This
was also the rim that had a chunk out of the centre boss, so I formed
up a new area using epoxy putty, a relatively simple process. When the
putty had cured, I filed it back to the profile of the boss. I also
used the putty to fill in a couple of deep gouges and an area of heavy
pitting.
I then spent a few hours going over the entire rim with various grades of wet-and-dry sandpaper (Photo 7). Each of these rims has 32 thin radial fins and 16 slots, so this is an extremely laborious process - and very hard on the hands and fingers. About this time, I thought that maybe the Daytona style of rims wouldn't look too bad on my Spider after all!
 Once
the rim was reasonably smooth, I washed off all the sanding dust with
detergent and water and wiped it down with a clean rag. I then gave the
rim a light coat of body-filler from a spray can. After it was dry, I
repeated the sanding process again, until I had removed just about all
of the filler. This whole process (filler-sand-clean) was repeated
three times until I was happy with the surface finish (Photo 8). From
the beginning, I had accepted that the completed rims would not have a
mirror-smooth surface - these were sand castings after all, not
precision-machined items and to achieve a truly fine finish would mean
layering on so much filler, here would be danger of it cracking off
over time.
Once
the rim was reasonably smooth, I washed off all the sanding dust with
detergent and water and wiped it down with a clean rag. I then gave the
rim a light coat of body-filler from a spray can. After it was dry, I
repeated the sanding process again, until I had removed just about all
of the filler. This whole process (filler-sand-clean) was repeated
three times until I was happy with the surface finish (Photo 8). From
the beginning, I had accepted that the completed rims would not have a
mirror-smooth surface - these were sand castings after all, not
precision-machined items and to achieve a truly fine finish would mean
layering on so much filler, here would be danger of it cracking off
over time.
 With
the four rims now ready for painting, I rigged up a rope around the
circumference of each rim and suspended them from the good old Hills
Hoist in the back yard. I washed them down with soapy water, before
giving them a final rinse and wipe down with turpentine. Again using a
spray can, I applied three very light coats of metal primer/undercoat
(Photo 9) . Between each coat, I gave the rims a light sand with
fine-grade wet-and-dry sandpaper and a wipe down with turpentine.
With
the four rims now ready for painting, I rigged up a rope around the
circumference of each rim and suspended them from the good old Hills
Hoist in the back yard. I washed them down with soapy water, before
giving them a final rinse and wipe down with turpentine. Again using a
spray can, I applied three very light coats of metal primer/undercoat
(Photo 9) . Between each coat, I gave the rims a light sand with
fine-grade wet-and-dry sandpaper and a wipe down with turpentine.
 I
let the rims cure for a few days before starting on the top coats. I
used an epoxy-enamel paint suitable for metal surfaces, choosing a
"natural aluminium" colour. I applied five very light coats from a
spray can over about a week, allowing a good 24 hours between coats
(Photo 10). Although applying paint using spray cans outdoors will
never match the finish obtained by a professional painter with a spray
gun and spray booth, acceptable results can still be achieved if
patience and restraint (ie: many, many thin coats) are exercised.
I
let the rims cure for a few days before starting on the top coats. I
used an epoxy-enamel paint suitable for metal surfaces, choosing a
"natural aluminium" colour. I applied five very light coats from a
spray can over about a week, allowing a good 24 hours between coats
(Photo 10). Although applying paint using spray cans outdoors will
never match the finish obtained by a professional painter with a spray
gun and spray booth, acceptable results can still be achieved if
patience and restraint (ie: many, many thin coats) are exercised.
 I
let the epoxy-enamel paint cure for about a week before attempting to
handle the rims any further. I was a little disconcerted about the
unnaturally-bright silver finish, but the final step in the painting
process, the application of a couple of spray coats of a protective
clear finish, muted the shininess nicely (Photo 11).
I
let the epoxy-enamel paint cure for about a week before attempting to
handle the rims any further. I was a little disconcerted about the
unnaturally-bright silver finish, but the final step in the painting
process, the application of a couple of spray coats of a protective
clear finish, muted the shininess nicely (Photo 11).
So, after a little over twelve months since I acquired the rims, I now had a set of alloys ready for tyres and fitting to the car. Although I hadn't intended to expend so much effort myself, I was relatively pleased with the end result. There was, however, one finishing touch remaining; Alfa Romeo logo badges for the wheel centres.
After a couple of e-mails to Australian distributors of Alfa parts, it appeared that neither new-old-stock or reproduction badges were available. One supplier, also a Spider owner, advised that he had used badges from the more modern Alfa 75/33 alloys on his own car's wheels. These badges were the correct external diameter, but they wouldn't clip into place on the Turbinas and needed to be glued or siliconed in place. This wasn't a desirable option for me, but I ordered a set of four badges to use just in case I couldn't find a better alternative
I continued to search websites of parts suppliers and eventually came across a UK supplier that had reproduction badges listed on their site. The badges were described as a concave metal disk with retaining circlip. I couldn't quite conceive how they would attach to my rims, but replies from the supplier to my e-mail enquiries assured me that they were suitable for rims from 105 series cars and he had supplied quite a few of the badges to other customers.
I ordered a set of four and they duly arrived after a couple of weeks. Unfortunately, my initial misgivings proved justified. The badges were of the correct diameter, but there was no way of attaching them to my rims, short of glue. Owners of Alfettas fitted with Turbinas would immediately have recognised the items as the badges from their rims, but I was ignorant of this at the time - as, apparently, was the UK specialist supplier! After a series of e-mails back and forth between myself and the supplier (I eventually had to draw a scale cross-section of my rims to convince him that there was no way the badges would work) he agreed to a refund.
 So,
it was back to Plan B - modifying the badges from the Alfa 33/75
wheels. Using the Dremel grinder again, I carefully removed the
retaining lugs from the back of the plastic badges so they would sit
snugly in the recess in the Turbina centre bosses (Photo 12). I
considered various ways of fabricating some type of clip to keep the
badges in place, but eventually decided that I would fix them in place
with silicone after the tyres had been fitted. This means, of course,
that they will need to be prised off each time the tyres are replaced
or balanced, but hopefully this will not be a frequent occurrence.
So,
it was back to Plan B - modifying the badges from the Alfa 33/75
wheels. Using the Dremel grinder again, I carefully removed the
retaining lugs from the back of the plastic badges so they would sit
snugly in the recess in the Turbina centre bosses (Photo 12). I
considered various ways of fabricating some type of clip to keep the
badges in place, but eventually decided that I would fix them in place
with silicone after the tyres had been fitted. This means, of course,
that they will need to be prised off each time the tyres are replaced
or balanced, but hopefully this will not be a frequent occurrence.
 Via
the AROCA forums I have subsequently found out what these centre badges
really look like and how they are attached. Chris, another Queensland
Alfisti, kindly provided me with photos of a cast badge and backing
plate from the original Cromodora Turbina alloys fitted to his 105 GTV
(Photo 13) and I am making the assumption that the ones fitted to the
Campagnolo rims are identical.
Via
the AROCA forums I have subsequently found out what these centre badges
really look like and how they are attached. Chris, another Queensland
Alfisti, kindly provided me with photos of a cast badge and backing
plate from the original Cromodora Turbina alloys fitted to his 105 GTV
(Photo 13) and I am making the assumption that the ones fitted to the
Campagnolo rims are identical.
Unless there is an Alfisti out there with a spare set in the garage, I don't hold out much hope of obtaining a set of these for my rims any time soon. I believe an enterprising American Alfisti resorted to getting reproduction badges cast in pewter for his own car so there is a possible lead for me to follow up.

 I
now had four nice shiny alloy rims for my Spider. I'm still on the
scrounge for a fifth rim (to replace the steel rim fitted to my spare
tyre) but I was now ready to move on to the next step; tyres. In the next instalment of this article, I will describe selecting tyres for the rims and the process of fitting and balancing the wheels.
I
now had four nice shiny alloy rims for my Spider. I'm still on the
scrounge for a fifth rim (to replace the steel rim fitted to my spare
tyre) but I was now ready to move on to the next step; tyres. In the next instalment of this article, I will describe selecting tyres for the rims and the process of fitting and balancing the wheels.